第4部分 函数和生成器
第16章 函数基础
函数是Python为了代码最大程度的重用和最小化代码冗余而提供的最基本的程序结构。
16.1 为什么使用函数
为什么使用函数: - 最大化的代码重用和最小化代码冗余 - 流程的分解
16.2 编写函数
Python函数背后的一些主要概念:
-
def语句是可执行的:不像C这样的编译型语言,def是一个可执行的语句。 -
def创建了一个函数对象并将其赋值给某一变量名。 -
lambda表达式创建一个函数对象但将其作为结果返回。 -
return语句将一个函数调用的结果对象发传递给调用者。 -
yield向调用者发回一个结果对象,但是记住它离开的位置:像生成器这样的函数,也可以通过yield语句来返回值,并挂起它们的状态以便稍后能够恢复状态。 -
global声明了一个模块级的变量并被赋值。 -
nonlocal声明了将要赋值的一个封闭的函数变量。 -
函数的参数是通过赋值(即对象引用)传递的。
-
参数、返回值以及变量并不是声明。可以传递任意类型的参数给函数,函数也可以返回任意类型的对象。
def语句
def语句将创建一个函数对象并将其赋值给一个变量名。def语句的一般格式如下所示:
def name(arg1, arg2,... argN):
 <statements>
 return value
Python的return语句可以在函数主体中的任何地方出现。它表示函数调用的结束,并将结果返回至调用函数的地方。
从技术角度来说,一个没有返回值的函数自动返回none对象,但这个值往往会被忽略掉。
def语句是实时执行的
Python的def语句实际上是一个可执行的语句,当它运行时,它创建一个新的函数对象,并将其赋值给一个函数名所表示的变量。
因为它是一个语句,所以一个def可以出现在任一语句可以出现的地方,甚至嵌套在其他语句中:
if test:
    def func(): # Define func this way
        ...
else:
    def func(): # Or else this way
        ...
...
func() # Call the version selected and built
与C语言这样的编译语言不同,Python函数在程序运行之前并不需要全部定义。更确切地说,def在运行时才进行评估,而在def之中的代码在函数调用后才会评估。
16.3 实例1:函数的定义和调用
定义
>>> def times(x, y): # Create and assign function
... return x * y # Body executed when called
...
调用
>>> times(2, 4) # Arguments in parentheses
8
>>> x = times(3.14, 4) # Save the result object
>>> x
12.56
>>> times('Ni', 4) # Functions are "typeless"
'NiNiNiNi'
Python中的多态
多态 是指一个操作的意义取决于被操作对象的类型。
因为Python是动态类型语言,所以多态在Python中随处可见。
只要对象支持预期的接口(a.k.a protocol),那么函数就能够自动地适用于所有对象类型。
16.4 实例2:寻找序列的交集
定义
def intersect(seq1, seq2):
    res = [] # Start empty
    for x in seq1: # Scan seq1
        if x in seq2: # Common item?
        res.append(x) # Add to end
    return res
调用
>>> s1 = "SPAM"
>>> s2 = "SCAM"
>>> intersect(s1, s2) # Strings
['S', 'A', 'M']
回顾多态
略
本地变量
略
第17章 作用域
17.1 Python作用域基础
当使用一个变量时,Python创建、改变或查找变量名都是在所谓的命名空间(保存变量名的地方)中进行的。
当我们谈论到搜索变量名对应于代码中的值的时候,术语 作用域 指的就是命名空间。
在代码中,给一个变量赋值的地方决定了这个变量将存在于哪个命名空间,也就是它可见的范围,即 作用域。
函数除了有打包代码的作用,还为程序提供了一个额外的命名空间。在默认的情况下,一个函数的所有变量名都与函数的命名空间相关联。这意味着:
- 一个在
def内定义的变量名能够被def内的代码使用;不能在函数的外部引用这样的变量名。 def之中的变量名与def之外的变量名并不冲突,即使是使用在别处的相同的变量名。
变量可以在3个不同的地方分配,分别对应3中不同的作用域:
-
如果一个变量在
def内赋值,它被定位在这个函数之内。 -
如果一个变量在一个嵌套的
def中赋值,对于嵌套的函数来说,它是非本地的。 -
如果在
def之外赋值,他就是整个文件全局的。
作用域法则
函数定义了本地作用域,而模块定义了全局作用域。这2个作用域有如下关系:
- 每个模块都是一个全局作用域,也就是说,一个创建于模块文件顶层的变量的命名空间。对于外部来说,全局变量就成为一个模块对象的属性;但是在一个模块内,能够像简单的变量一样使用。
- 全局作用域的作用范围仅限于单个文件:一个文件的顶层的变量名仅对于这个文件内部的代码而言是全局的。
- 每次对函数的调用都创建了一个新的本地作用域,换句话说,每一个函数调用都创建了一个新的本地命名空间。
- 赋值的变量名除非声明为全局变量或非本地变量,否则均为本地变量(即,位于本地作用域内)。
- 所有其他的变量名都可以归纳为本地、全局或者内置的(即,由Python的预定义
__builtin__模块提供的)。
注意:一个函数内部的任何类型的赋值都会把一个名称划定为本地的。这包括
=语句、import中的模块名称、def中的函数名称等。如果在一个def中以任何方式赋值一个变量名,对于该函数,它都将成为本地的。原处改变对象并不会导致变量被划分为本地变量,只有对变量名进行赋值才会。
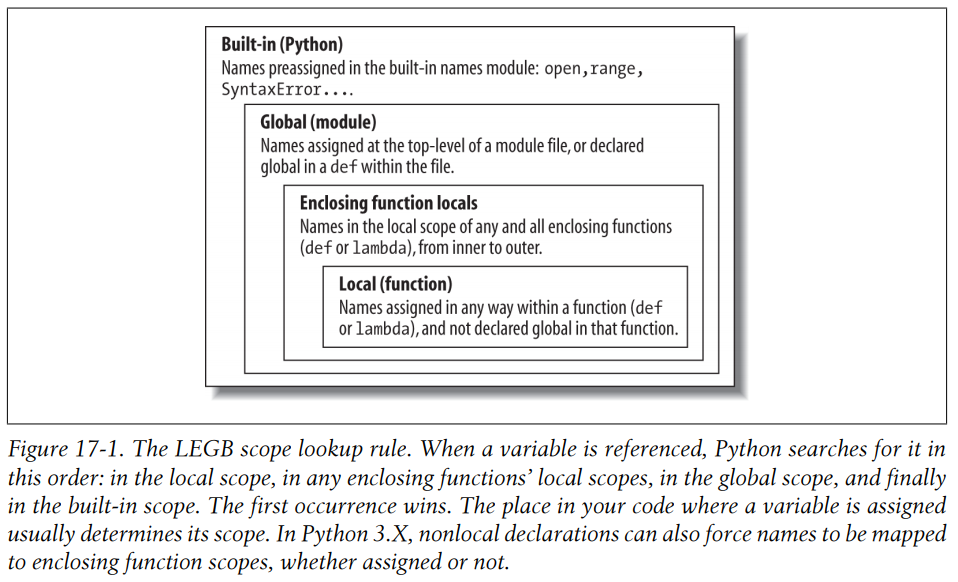
变量名解析:LEGB原则
对于一个def语句:
- 变量名引用分为三个作用域进行查找:首先是本地,其次是函数内(如果有的话),之后是全局,最后是内置(由Python的预定义__builtin__模块提供的)。
- 在默认情况下,变量名赋值会创建或改变本地变量。
- 全局声明和非本地声明将赋值的变量名映射到模块文件内部的作用域。
所有在函数def语句(或者lambda)内赋值的变量名默认均为本地变量。函数你能够在函数内部和全局作用域直接使用变量名,但要想对其进行修改,必须将其声明为非全局变量和全局变量。
Python 的变量名解析机制有时称为LEGB法则,这也是由作用域的名称而来的:
- 当使用一个函数内未认证的变量名时,Python 依次搜索4个作用域:本地作用域(L),上一层结构中def或lambda的本地作用域(E),全局作用域(G),内置作用域(B)并在第一处能够找到这个变量名的地方停下来。如果没用找到,则会报错。
- 当在函数中给一个变量名赋值时(而不是在一个表达式中对其进行引用),Python总是创建或改变本地作用域的变量名,除非它已经在那个函数中声明为全局变量。
- 当在任何函数之外给一个变量名赋值时(也就是,在一个模块文件的顶层,或者是在交互提示模式下),本地作用域与全局作用域(这个模块的命名空间)是相同的。
下图描述了4个作用域的关系:
作用域实例
# Global scope
X = 99 # X and func assigned in module: global

def func(Y): # Y and Z assigned in function: locals
    # Local scope
    Z = X + Y # X is a global
    return Z

func(1) # func in module: result=100
内置作用域
在Python 3.X中,内置作用域是通过一个名为builtins的标准库模块来实现的,但是必须要import builtins之后才能使用内置作用域,因为变量名builtins本身并没有预先内置。
导入builtins模块,调用dir查看其中预定义了哪些变量名:
Python 3.7.0 (default, Jun 28 2018, 08:04:48) [MSC v.1912 64 bit (AMD64)] :: Anaconda, Inc. on win32
Type "help", "copyright", "credits" or "license" for more information.
>>>
>>> import builtins
>>> dir(builtins)
['ArithmeticError', 'AssertionError', 'AttributeError', 'BaseException', 'BlockingIOError', 'BrokenPipeError', 'BufferError', 'BytesWarning', 'ChildProcessError', 'ConnectionAbortedError', 'ConnectionError', 'ConnectionRefusedError', 'ConnectionResetError', 'DeprecationWarning', 'EOFError', 'Ellipsis', 'EnvironmentError', 'Exception', 'False', 'FileExistsError', 'FileNotFoundError', 'FloatingPointError', 'FutureWarning', 'GeneratorExit', 'IOError', 'ImportError', 'ImportWarning', 'IndentationError', 'IndexError', 'InterruptedError', 'IsADirectoryError', 'KeyError', 'KeyboardInterrupt', 'LookupError', 'MemoryError', 'ModuleNotFoundError', 'NameError', 'None', 'NotADirectoryError', 'NotImplemented', 'NotImplementedError', 'OSError', 'OverflowError', 'PendingDeprecationWarning', 'PermissionError', 'ProcessLookupError', 'RecursionError', 'ReferenceError', 'ResourceWarning', 'RuntimeError', 'RuntimeWarning', 'StopAsyncIteration', 'StopIteration', 'SyntaxError', 'SyntaxWarning', 'SystemError', 'SystemExit', 'TabError', 'TimeoutError', 'True', 'TypeError', 'UnboundLocalError', 'UnicodeDecodeError', 'UnicodeEncodeError', 'UnicodeError', 'UnicodeTranslateError', 'UnicodeWarning', 'UserWarning', 'ValueError', 'Warning', 'WindowsError', 'ZeroDivisionError', '__build_class__', '__debug__', '__doc__', '__import__', '__loader__', '__name__', '__package__', '__spec__', 'abs', 'all', 'any', 'ascii', 'bin', 'bool', 'breakpoint', 'bytearray', 'bytes', 'callable', 'chr', 'classmethod', 'compile', 'complex', 'copyright', 'credits', 'delattr', 'dict', 'dir', 'divmod', 'enumerate', 'eval', 'exec', 'exit', 'filter', 'float', 'format', 'frozenset', 'getattr', 'globals', 'hasattr', 'hash', 'help', 'hex', 'id', 'input', 'int', 'isinstance', 'issubclass', 'iter', 'len', 'license', 'list', 'locals', 'map', 'max', 'memoryview', 'min', 'next', 'object', 'oct', 'open', 'ord', 'pow', 'print', 'property', 'quit', 'range', 'repr', 'reversed', 'round', 'set', 'setattr', 'slice', 'sorted', 'staticmethod', 'str', 'sum', 'super', 'tuple', 'type', 'vars', 'zip']
>>>
这个列表中的变量名组成了Python中的内置作用域,其中前面一半是内置的异常,后面一半是内置函数。
由于LEGB法则,Python最后将自动搜索这个模块,将会自动得到这个列表中的所有变量名。也就是说,你不需要手动导入这个模块,就可以使用这些变量名。
>>> zip        # 不手动导入builtins模块,直接调用内置函数zip,让LEGB法则自动搜索
<class 'zip'>
但是,如果本地作用域的变量名覆盖了全局作用域或内置作用域中相同变量名的变量时,就需要使用以下方法,手动导入builtins模块,并使用模块名.属性的方法调用内置函数:
>>> import builtins  # 手动导入builtins模块
>>> builtins.zip     # 使用模块名.属性的方式调用内置函数zip
<class 'zip'>
>>>
>>> def hider():
...     open = 'spam'    # 本地作用域变量open覆盖了内置函数open
...     builtins.open('file.txt')   # 使用模块名.属性的方式调用内置函数open
...
注意:有趣的是,在大多数全局作用域中,包括交互式会话,都预先设置了一个名为
__builtins__的变量来引用Python 3.X中的内置模块builtins。
>>> import builtins
>>> builtins is __builtins__    # builtins和__builtins__是同一个对象
True
>>> id(builtins)
2685050506520
>>> id(__builtins__)
2685050506520
>>> dir(__builtins__)
['ArithmeticError', 'AssertionError', 'AttributeError', 'BaseException', 'BlockingIOError', 'BrokenPipeError', 'BufferError', 'BytesWarning', 'ChildProcessError', 'ConnectionAbortedError', 'ConnectionError', 'ConnectionRefusedError', 'ConnectionResetError', 'DeprecationWarning', 'EOFError', 'Ellipsis', 'EnvironmentError', 'Exception', 'False', 'FileExistsError', 'FileNotFoundError', 'FloatingPointError', 'FutureWarning', 'GeneratorExit', 'IOError', 'ImportError', 'ImportWarning', 'IndentationError', 'IndexError', 'InterruptedError', 'IsADirectoryError', 'KeyError', 'KeyboardInterrupt', 'LookupError', 'MemoryError', 'ModuleNotFoundError', 'NameError', 'None', 'NotADirectoryError', 'NotImplemented', 'NotImplementedError', 'OSError', 'OverflowError', 'PendingDeprecationWarning', 'PermissionError', 'ProcessLookupError', 'RecursionError', 'ReferenceError', 'ResourceWarning', 'RuntimeError', 'RuntimeWarning', 'StopAsyncIteration', 'StopIteration', 'SyntaxError', 'SyntaxWarning', 'SystemError', 'SystemExit', 'TabError', 'TimeoutError', 'True', 'TypeError', 'UnboundLocalError', 'UnicodeDecodeError', 'UnicodeEncodeError', 'UnicodeError', 'UnicodeTranslateError', 'UnicodeWarning', 'UserWarning', 'ValueError', 'Warning', 'WindowsError', 'ZeroDivisionError', '__build_class__', '__debug__', '__doc__', '__import__', '__loader__', '__name__', '__package__', '__spec__', 'abs', 'all', 'any', 'ascii', 'bin', 'bool', 'breakpoint', 'bytearray', 'bytes', 'callable', 'chr', 'classmethod', 'compile', 'complex', 'copyright', 'credits', 'delattr', 'dict', 'dir', 'divmod', 'enumerate', 'eval', 'exec', 'exit', 'filter', 'float', 'format', 'frozenset', 'getattr', 'globals', 'hasattr', 'hash', 'help', 'hex', 'id', 'input', 'int', 'isinstance', 'issubclass', 'iter', 'len', 'license', 'list', 'locals', 'map', 'max', 'memoryview', 'min', 'next', 'object', 'oct', 'open', 'ord', 'pow', 'print', 'property', 'quit', 'range', 'repr', 'reversed', 'round', 'set', 'setattr', 'slice', 'sorted', 'staticmethod', 'str', 'sum', 'super', 'tuple', 'type', 'vars', 'zip']
17.2 global语句
全局变量名 具有以下特点:
- 全局变量是位于模块文件内部的顶层的变量名。
- 全局变量如果是在函数内被赋值的话,必须经过声明。
- 全局变量名在函数的内部不经过声明也可以被引用。
global语句是一个命名空间声明语句。它告诉Python函数打算生成一个或多个全局变量名,即存在于整个模块内部作用域(命名空间)的变量名。
在默认情况下,函数内部注册的变量名是本地变量,所以如果希望在函数外部对变量进行改变,必须使用global语句声明该变量为全局变量。
global语句包含了关键字global,其后跟着一个或多个有逗号分开的变量名。
当在函数主体被赋值或引用时,所有列出来的变量名将被映射到整个模块的作用域内:
X = 88 # Global X
def func():
    global X
    X = 99 # Global X: outside def
func()
print(X) # Prints 99
最小化全局变量
最好尽可能地避免使用全局变量。
最小化文件间的修改
每个模块文件都是自包含的命名空间(变量名的封装),而且我们必须导入一个模块才能在另一个模块中看到它内部的变量。
一个模块文件的全局变量一旦被导入就成为了这个模块对象的一个属性,也就是说,导入者自动得到了这个被导入的模块文件的所有全局变量的访问权,所以在一个文件被导入后,它的全局作用域实际上就构成了一个对象的属性。
虽然我们无法避免修改文件间的变量,但是通常的做法是最小化文件间变量的修改。
其他访问全局变量的方法
# thismod.py
var = 99 # Global variable == module attribute
def local():
    var = 0 # Change local var
def glob1():
    global var # Declare global (normal)
    var += 1 # Change global var
def glob2():
    var = 0 # Change local var
    import thismod # Import myself
    thismod.var += 1 # Change global var
def glob3():
    var = 0 # Change local var
    import sys # Import system table
    glob = sys.modules['thismod'] # Get module object (or use __name__)
    glob.var += 1 # Change global var
def test():
    print(var)
    local()   # 对全局变量var没有任何影响
    glob1()   #
    glob2()
    glob3()
    print(var)
17.3 作用域和嵌套函数
LEGB查找法则中,E表示 嵌套作用域(有时也叫做 静态嵌套作用域 ),它代表任意嵌套函数内部的本地作用域,即,被嵌套函数的外层函数的本地作用域。
嵌套作用域的细节
在增加了嵌套作用域后,完整的LEGB查找过程是这样的:
- 一个引用X首先在本地(函数内)作用域查找变量名X;然后,如果是被嵌套函数,则会由内到外查找其外层的每一层嵌套函数的本地作用域,直到找到为止;之后查找当前的全局作用域;最后再查找内置作用域(即
__builtins__)。 - 在默认情况下,一个赋值(如
X = value)创建或改变变量名X的当前作用域。如果X在函数内声明为全局变量,它将会创建或改变变量名X为整个模块的作用域。如果X在函数内声明为nonlocal,赋值会修改最近的嵌套函数的本地作用域中的变量名X。
示例:
>>> def test1():
...     x = 100
...     def test2():
...         def test3():
...             print(x)  # 将由内向外在每一层嵌套函数的本地作用域中查找变量x,直到在test1的本地作用域中找到x
...         test3()
...     test2()
...
>>> test1()
100
嵌套作用域举例
X = 99 # Global scope name: not used
def f1():
    X = 88 # Enclosing def local
    def f2():
        print(X) # Reference made in nested def
    f2()
f1() # Prints 88: enclosing def local
工厂函数
如果一个能够记住嵌套作用域的变量值的函数,甚至尽管那个作用域或许已经不存在了,也依然能够记住,这样的函数叫做 闭包 (closure) 或者 工厂函数。
def maker(N):
    def action(X): # Make and return action
        return X ** N # action retains N from enclosing scope
    return action
>>>
>>> f = maker(2)
>>> f
<function __main__.maker.<locals>.action(X)>
>>> f(3)
9
>>> f(4)
16
使用默认参数来保留嵌套作用域的状态
较早版本的Python没有嵌套作用域的概念,所以需要使用默认参数来保留嵌套作用域的状态:
def f1():
    x = 88
    def f2(x=x):
        print(x)
    f2()
>>> f1()
嵌套作用域,默认参数和lambda表达式
lambda表达式的功能与def语句的功能相似,但它是一个表达式,它会生成后面调用的一个新的函数。 注意,像def语句一样,lambda表达式会引入新的本地作用域。
def func():
    x = 4
    action = (lambda n: x ** n) # x remembered from enclosing def
    return action

>>> x = func()
>>> print(x(2)) # Prints 16, 4 ** 2
对于较早版本的Python,和def语句一样,程序员需要使用默认参数从上层作用域传递值给lambda表达式:
def func():
    x = 4
    action = (lambda n, x=x: x ** n) # Pass x in manually
    return action
循环变量可能要求默认参数
在新版本的Python中,在函数内嵌套def语句或lambda表达式时,由于已经支持了嵌套作用域,所以使用参数默认值来传递值并不是必须的,内嵌函数和lambda表达式可以通过LEGB法则找到嵌套作用域中的变量。但是有个值得注意的特例!
例如,下面代码试图创建一个函数的列表,其中每个函数都记住嵌套作用域中当前变量i的值,但却不奏效:
>>> def makeActions():
...     acts = []
...     for i in range(5):
...         acts.append(lambda x: i**x)
...     return acts
...
>>> acts = makeActions()
>>> acts[0]
<function makeActions.<locals>.<lambda> at 0x000002712B652510>
>>> acts[1]
<function makeActions.<locals>.<lambda> at 0x000002712B652598>
>>> acts[2]
<function makeActions.<locals>.<lambda> at 0x000002712B652620>
>>> acts[3]
<function makeActions.<locals>.<lambda> at 0x000002712B6526A8>
>>> acts[4]
<function makeActions.<locals>.<lambda> at 0x000002712B652730>
>>> acts[0](2)
16
>>> acts[1](2)
16
>>> acts[2](2)
16
>>> acts[3](2)
16
>>> acts[4](2)
16
原因在于:因为嵌套作用域中的变量在被嵌套的函数被调用时才进行查找,而当被嵌套函数调用时,i的值其实是最后一次循环迭代中变量的值4。
为了更好的解释这一现象,我构造了以下函数:
>>> def test1():
...     x = 1
...     print('x in test1 = {}'.format(x))
...     def test2():     # 创建函数对象test2时,x的值为1,但调用时,输出却和预料的不同。
...         print('x in test2 = {}'.format(x))
...     x = 2
...     print('x in test1 = {}'.format(x))
...     return test2
...
>>> test2 = test1()
x in test1 = 1
x in test1 = 2
>>> test2()       # 可以看到,test2在被创建时,x的值为1,而调用时却输出x的值为2
x in test2 = 2
可以看到,函数test2在被创建时,x的值为1,但由于被嵌套函数在调用时才会进行查找,而test2调用时,x的值为2,所以函数test2记住了x=2的状态。
注意:为了让这类代码能够工作,必须使用默认参数把当前的值传递给嵌套作用域的变量。因为默认参数是嵌套函数创建时评估的,每一个函数记住了自己的变量i的值。
例如,使用默认参数传递值给嵌套作用域变量i:
>>> def makeActions():
...     acts = []
...     for i in range(5):
...         acts.append(lambda x, i=i: i**x)   # 使用默认参数传递值给嵌套作用域变量i
...     return acts
...
>>> acts = makeActions()
>>> acts[0](2)
0
>>> acts[1](2)
1
>>> acts[2](2)
4
>>> acts[3](2)
9
>>> acts[4](2)
16
>>>
同样的,使用默认参数传递值给嵌套作用域变量x:
>>> def test1():
...     x = 1
...     print('x in test1 = %d' % x)
...     def test2(x=x):   # 使用默认参数传递值给嵌套作用域变量x
...         print('x in test2 = %d' % x)
...     x = 2
...     print('x in test1 = %d' % x)
...     return test2
...
>>> test2 = test1()
x in test1 = 1
x in test1 = 2
>>> test2()
x in test2 = 1
任意作用域的嵌套
注意,作用域可以做任意的嵌套,但是只有内嵌的函数(而不是类)会被搜索:
>>> def f1():
...     x = 99
...     def f2():
...         def f3():
...             print(x) # Found in f1's local scope!
...         f3()
...     f2()
...
>>> f1()
99
17.4 nonlocal语句
默认情况下,被嵌套函数可以引用一个嵌套函数作用域中的变量,即便这个函数已经返回了,但不允许修改。
>>> def test1():
...     x = 1
...     def test2():
...         print(x)
...     test2()
...
>>> test1()    # 函数test2可以直接引用函数test1的本地变量
1
>>> def test1():
...     x = 1
...     def test2():
...         x += 1
...     test2()
...
>>> test1()     # 函数test2不允许修改函数test1的本地变量
Traceback (most recent call last):
  File "<stdin>", line 1, in <module>
  File "<stdin>", line 5, in test1
  File "<stdin>", line 4, in test2
UnboundLocalError: local variable 'x' referenced before assignment
在Python 3.X中,我们也可以修改这样的嵌套作用域变量,只要我们在一条nonlocal语句中声明它们,被嵌套的函数(函数中def语句定义的函数)就可以对嵌套函数中的变量名进行修改。
- nonlocal语句声明将要在一个嵌套的作用域中修改的名称。
- nonlocal应用于一个被嵌套函数(函数中def语句定义的函数)的作用域中的变量名,例如:
>>> x = 100
>>> def test1():
...     x = 1
...     def test2():
...         nonlocal x   # 声明x为nonlocal
...         x = 2
...         print('x = %d' % x)
...     test2()
...
>>> test1()     # 函数test2修改了函数test1的本地变量
x = 2
>>> x         # 但全局变量x并没有受到影响
100
- 并且,在声明nonlocal该名称的时候,它必须已经存在于该嵌套函数(外层函数)的作用域中,即不能由一个被嵌套的函数(函数中def语句定义的函数)首次赋值而创建。例如:
>>> x = 100
>>> def test1():
...     def test2():
...             nonlocal x    # 外层函数中并没有变量x,所以会出错
...             x = 2
...             print('x = %d' % x)
...     test2()
...
  File "<stdin>", line 3
SyntaxError: no binding for nonlocal 'x' found
注意,nonlocal语句的这一特点和global语句不同:即便全局作用域中不存在变量x,也可是使用global语句声明全局变量x。例如:
>>> del x
>>> x
Traceback (most recent call last):
  File "<stdin>", line 1, in <module>
NameError: name 'x' is not defined
>>> def test1():
...     global x    # 即便,全局作用域中不存在变量x,也可是使用global语句声明全局变量x
...     x = 1
...
>>> test1()
>>> x
1
nonlocal基础
Python 3.0引入了一条新的nonlocal语句,它只能出现在被嵌套的def语句中:
def func():
    nonlocal name1, name2, ...
这条语句允许一个被嵌套函数(函数中def语句定义的函数)来修改在闭包函数(enclosing function)或外层函数中定义的一个或多个变量名。
nonlocal语句加快了变量查找,它使得对该语句中列出的变量名的查找从嵌套def的作用域中开始,而不是从本地作用域开始,也就是说,nonlocal意味着完全略过本地作用域。
当在一个函数中使用global或nonlocal语句时,都会在某种程度上限制LEGB查找规则:
- global使得作用域查找从嵌套的模块作用域开始,并且允许对那里的变量名赋值。如果变量名不存在该模块中,则继续查找内置作用域。
- nonlocal限制作用域查找只在嵌套的def中,且要求变量名已被定义,并允许对它们赋值。作用域查找不会继续到全局作用域或内置作用域。
nonlocal应用
使用nonlocal进行修改
>>> def tester(start):
...     state = start            # Each call gets its own state
...     def nested(label):
...         nonlocal state       # Remembers state in enclosing scope
...         print(label, state)  # Allowed to change it if nonlocal
...         state += 1
...     return nested
...
>>> F = tester(0)
>>> F('spam')         # Increments state on each call
spam 0
>>> F('ham')
ham 1
>>> F('eggs')
通常使用嵌套作用域引用时,我们可以多次调用工厂函数tester,以便在内存中获得其状态的多个副本。
eggs 2
>>> G = tester(42)     # Make a new tester that starts at 42
>>> G('spam')
spam 42
>>> G('eggs')         # My state information updated to 43
eggs 43
>>> F('bacon')   # F中的state和G中的state互不影响
bacon 3          # Each call has different state information
边界情况
和global语句不同,当执行一条nonlocal语句时,nonlocal声明必须已经在嵌套作用域中赋值过,否则会得到一个错误。
>>> def tester(start):
        def nested(label):
            nonlocal state # Nonlocals must already exist in enclosing def!
            state = 0
            print(label, state)
        return nested
SyntaxError: no binding for nonlocal 'state' found
>>> def tester(start):
        def nested(label):
            global state # Globals don't have to exist yet when declared
            state = 0 # This creates the name in the module now
            print(label, state)
        return nested
>>> F = tester(0)
>>> F('abc')
abc 0
>>> state
0
nonlocal限制作用域查找仅为嵌套的def,nonlocal不会在嵌套的模块的全局作用域或所有def之外的内置作用域中查找,即便已经有了这些作用域:
>>> spam = 99
>>> def tester():
...     def nested():
...         nonlocal spam
...         print('Current=', spam)
...         spam += 1
...     return nested
...
  File "<stdin>", line 3
SyntaxError: no binding for nonlocal 'spam' found
为什么使用nonlocal
nonlocal语句允许在内存中保持可变状态的多个副本,并且解决了简单的状态保持。
使用nonlocal的状态:仅3.X可用
第5版内容,暂略。
使用global的状态
第5版内容,暂略。
使用类的状态:显式属性
第5版内容,暂略。
使用函数属性的状态: 3.X 和 2.X都可用
>>> def tester(start):
...     def nested(label):
...         print(label, nested.state)    # nested is in enclosing scope
...         nested.state += 1         # Change attr, not nested itself
...     nested.state = start       # Initial state after func defined
...     return nested
...
>>> F = tester(0)
>>> F('spam')           # F is a 'nested' with state attached
spam 0
>>> F('ham')
ham 1
>>> F.state             # Can access state outside functions too
2
>>> G = tester(42)      # G has own state, doesn't overwrite F's
>>> G('eggs')
eggs 42
>>> F('ham')
ham 2
>>> F.state           # State is accessible and per-call
3
>>> G.state
43
>>> F is G          # Different function objects
False
第 18 章 参数
18.1 传递参数
在Python中,无论是可变对象还是不可变对象,默认都是通过引用进行函数的参数传递。这可以看作是将对象赋值给了在def语句头部的参数变量名。这也意味着不需要创建多个拷贝就可以在我们的程序中传递很大的对象,并且能够按需修改这些对象。
给函数传递参数时的注意事项:
- 参数的传递是通过自动将对象赋值给本地变量名来实现的。因为引用是以指针的形式实现的,所有的参数实际上都是通过指针进行传递的。
- 在函数内部的参数名的赋值不会影响调用者。在函数运行时,在函数头部的参数名是一个新的、本地的变量名,这个变量名是在函数的本地作用域内的。
- 改变函数的可变对象参数的值也许会对调用者有影响。换句话说,因为参数是简单地赋值给传入的对象,函数能够原处改变传入的可变对象。
Python的通过引用进行参数传递的机制:
- 不可变参数通过“引用”进行传递。例如,整数和字符串、元组这样的对象是通过对象引用而不是拷贝进行传递的,但是因为不可能在原处改变不可变对象,所以实际效果就很像创建了一份拷贝。
- 可变对象是通过“引用”进行传递的。例如,列表和字典等可变对象也是通过对象引用进行传递的,所以可变对象能够在函数内部进行原处修改。这一点与C语言使用指针传递数组很相似。
注意:其实,不管是可变对象还是不可变对象,参数传递时都是按引用传递的!
参数和共享引用
注意,当参数传递像列表和字典这样的可变对象的时候,对这样的可变对象的原处修改可能在函数退出后依然有效,并由此影响到调用者:
>>> def changer(a, b):
...     a = 2          # 只修改本地变量名的值
...     b[0] = 'spam'  # 原处修改共享对象
...
>>> X = 1
>>> L = [1,2]
>>> changer(X, L)     # 传递不可变对象和可变对象
>>> X, L              # 不可变对象X没有被修改,可变对象L被修改
(1, ['spam', 2])
>>>
避免可变参数的修改
如果不希望函数内部的原处修改影响到传递给它的可变对象,那么,可以简单的创建一个明确的可变对象的拷贝。
可以在函数调用时进行拷贝:
>>> def changer(a, b):
...     a = 2
...     b[0] = 'spam'
...
>>> X = 1
>>> L = [1,2]
>>> changer(X, L[:])   # Pass a copy, so our 'L' does not change
>>> X, L
(1, [1, 2])
>>>
也可以在函数内部进行拷贝:
>>> def changer(a, b):
...     a = 2
...     b = b[:]         # Copy input list so we don't impact caller
...     b[0] = 'spam'    # Changes our list copy only
...
>>> X = 1
>>> L = [1,2]
>>> changer(X, L)
>>> X, L
(1, [1, 2])
>>>
以上两种机制都不能阻止函数改变对象,这样做仅仅是防止改变会影响调用者。为了强制函数绝不改变传入的参数,我们总是能够将可变对象转为不可变对象来杜绝这种问题:
>>> L = [1,2]
>>> changer(X, tuple(L))   # Pass a tuple, so changes are errors
>>> X, L
(1, [1, 2])
对参数输出进行模拟
return能够返回任意对象,所以也能够返回多个值,如果这些值被封装进一个元组或其他的集合类型。
>>> def multiple(x, y):
...     x = 2
...     y = [3, 4]
...     return x, y
...
>>> X = 1
>>> L = [1, 2]
>>> X, L
(1, [1, 2])
>>> multiple(X, L)     # 返回一个元组
(2, [3, 4])
>>> X, L = multiple(X, L)   # 元组解包赋值
>>> X, L
(2, [3, 4])
18.2 特定的参数匹配模型
在默认情况下,参数是按照其位置进行匹配的,从左至右,而且传递的参数和函数头部参数名个数必须一致。
基础知识
函数参数匹配规则:
- 位置参数:从左至右进行匹配。
- 关键字参数:通过参数名进行匹配。
- 默认参数:为没有传入值的参数定义默认参数值
- 可变参数(Varargs collecting):收集任意多的基于位置或关键字的参数。
- 可变参数解包(Varargs unpacking):传递任意多的基于位置或关键字的参数。
- Keyword-Only参数:参数必须按照名称传递。
函数参数匹配语法
函数参数匹配语法如下表:
| Syntax | Location | Interpretation |
|---|---|---|
func(value) |
Caller | Normal argument: matched by position |
func(name=value) |
Caller | Keyword argument: matched by name |
func(*iterable) |
Caller | Pass all objects in iterable as individual positional arguments |
func(**dict) |
Caller | Pass all key/value pairs in dict as individual keyword arguments |
def func(name) |
Function | Normal argument: matches any passed value by position or name |
def func(name=value) |
Function | Default argument value, if not passed in the call |
def func(*name) |
Function | Matches and collects remaining positional arguments in a tuple |
def func(**name) |
Function | Matches and collects remaining keyword arguments in a dictionary |
def func(*other, name) |
Function | Arguments that must be passed by keyword only in calls (3.X) |
def func(*, name=value) |
Function | Arguments that must be passed by keyword only in calls (3.X) |
细节
如果要混合使用特定的参数匹配模式,Python将会遵循下面的顺序:
- 在函数调用中,参数必须以此顺序出现:1.任何位置参数(value);2.关键字参数(name=value);3.
*sequence形式;4.**dict形式; - 在函数定义时,参数必须以此顺序出现:1.任何一般参数(name);2.任何默认参数(name=value);3.
*name或Python 3.X中的*;4.任何name或name=value的keyword-only参数(Python 3.X);5.**name形式;
Python内部按以下步骤在赋值前进行参数匹配:
- 通过位置分配非关键字参数。
- 通过匹配变量名分配关键字参数。
- 其他额外的非关键字参数分配到
*name元组中。 - 其他额外的关键字参数分配到
**name字典中。 - 用默认值分配头部中未得到分配的参数。
关键字参数和默认参数的实例
位置参数
Python默认通过位置从左到右匹配参数变量名:
>>> def f(a, b, c):print(a, b, c)
...
>>> f(1, 2, 3)   # 使用位置参数调用函数
1 2 3
关键字参数
关键字参数允许通过变量名进行匹配,而不是通过参数位置:
>>> def f(a, b, c):print(a, b, c)
...
>>> f(c=3, a=1, b=2)   # 使用关键字参数调用函数
1 2 3
>>> f(1, c=3, b=2)   # 混合使用位置参数和关键字参数
1 2 3
默认参数
>>> def f(a, b=2, c=3):print(a, b, c)    # 为参数b和c定义默认值
...
>>> f(1)
1 2 3
>>> f(a=1)
1 2 3
>>> f(1,4)
1 4 3
>>> f(1,4,5)
1 4 5
>>> f(1, c=6)
1 2 6
关键字参数和默认参数混合
>>> def func(spam, eggs, toast=0, ham=0):
...     print((spam, eggs, toast, ham))
...
>>> func(1, 2)
(1, 2, 0, 0)
>>> func(1, ham=1, eggs=0)
(1, 0, 0, 1)
>>> func(spam=1, eggs=0)
(1, 0, 0, 0)
>>> func(toast=1, eggs=2, spam=3)
(3, 2, 1, 0)
>>> func(1, 2, 3, 4)
(1, 2, 3, 4)
任意参数的实例
*和**匹配是让函数支持接受任意数目的参数。
收集参数
在函数定义中,*特性使用元组收集不匹配的剩余的位置参数:
>>> def f(*args):print(args)    # 将所有位置参数都收集到元组args中
...
>>> f()
()
>>> f(1)
(1,)
>>> f(1,2,3,4)
(1, 2, 3, 4)
在函数定义中,**特性使用字典收集不匹配的剩余关键字参数:
>>> def f(**args): print(args)
...
>>> f()
{}
>>> f(a=1, b=2)
{'a': 1, 'b': 2}
函数头部能够混合使用一般参数、*参数和**参数,以实现更加灵活的调用方式:
>>> def f(a, *pargs, **kargs): print(a, pargs, kargs)
...
>>> f(1, 2, 3, x=1, y=2)
1 (2, 3) {'x': 1, 'y': 2}
解包参数
在调用函数时使用*特性会解包参数的集合:
>>> def func(a, b, c, d): print(a, b, c, d)
...
>>> args = (1, 2, 3, 4)
>>> func(*args)
1 2 3 4
相似地,在调用函数时使用**特性会以键值对的形式解包一个字典,使其成为独立的关键字参数:
>>> dicts = {'a':1, 'b':2, 'c':3, 'd':4}
>>> func(**dicts)
1 2 3 4
除此以外,我们还能够以非常灵活的方式混合使用普通参数、基于位置的参数以及关键字参数:
>>> func(*(1,2), **{'d':4, 'c':3})
1 2 3 4
>>> func(1, *(2, 3), **{'d':4})
1 2 3 4
>>> func(1, c=3, *(2,), **{'d':4})
1 2 3 4
>>> func(1, *(2, 3), d=4)
1 2 3 4
>>> func(1, *(2,), c=3, **{'d':4})
1 2 3 4
通用地应用函数
if sometest:
    action, args = func1, (1,) # Call func1 with one arg in this case
else:
    action, args = func2, (1, 2, 3) # Call func2 with three args here
...etc...
action(*args) # Dispatch generically
Python 3.X Keyword-Only 参数
从Python 3.0开始,Python允许我们制定keyword-only参数——在def语句函数头中,出现*args或*之后的参数必须只按照关键字传递并且不会由一个未知参数来填充的参数。其中*args形式允许参数args接受所有没有被匹配的剩余位置参数;而*形式不允许任何额外的位置参数传递,其作用仅用于指出其后的参数为keyword-only参数。
例如,在如下代码中,参数a可以按位置或关键字传递;参数b将接受所有没有被匹配的剩余位置参数;参数c出现在*b之后,所以参数c是keyword-only参数,必须使用关键字传递:
>>> def kwonly(a, *b, c):        # 参数b将接受所有没有被匹配的剩余位置参数
...     print(a, b, c)
...
>>> kwonly(1, 2, c=3)
1 (2,) 3
>>> kwonly(a=1, c=3)
1 () 3
>>> kwonly(1, 2, 3)              # 参数c在*b之后,所以c为keyword-only参数,必须使用关键字传递参数
Traceback (most recent call last):
  File "<stdin>", line 1, in <module>
TypeError: kwonly() missing 1 required keyword-only argument: 'c'
>>> kwonly(a=1, b=2, c=3)       # 参数b将接受所有没有被匹配的剩余位置参数,不能使用关键字传递参数
Traceback (most recent call last):
  File "<stdin>", line 1, in <module>
TypeError: kwonly() got an unexpected keyword argument 'b'
>>> kwonly(a=1, b=(2,), c=3)   # 参数b将接受所有没有被匹配的剩余位置参数,不能使用关键字传递参数
Traceback (most recent call last):
  File "<stdin>", line 1, in <module>
TypeError: kwonly() got an unexpected keyword argument 'b'
在下面代码中,参数a可以按位置或关键字传递;但参数b和c出现在*之后,所以参数b和c是keyword-only参数,只能按照关键字传递,不允许任何其他额外的位置传递:
>>> def kwonly(a, *, b, c):
...     print(a, b, c)
...
>>> kwonly(1, c=3, b=2)
1 2 3
>>> kwonly(c=3, b=2, a=1)
1 2 3
>>> kwonly(1, 2, 3)
Traceback (most recent call last):
  File "<stdin>", line 1, in <module>
TypeError: kwonly() takes 1 positional argument but 3 were given
>>> kwonly(1)
Traceback (most recent call last):
  File "<stdin>", line 1, in <module>
TypeError: kwonly() missing 2 required keyword-only arguments: 'b' and 'c'
keyword-only参数同样可以设置默认值,即便它们出现在函数头部中的*后面:
>>> def kwonly(a, *, b='spam', c='ham'):
...     print(a, b, c)
...
>>> kwonly(1)
1 spam ham
>>> kwonly(1, c=3)
1 spam 3
>>> kwonly(a=1)
1 spam ham
>>> kwonly(c=3, b=2, a=1)
1 2 3
>>> kwonly(1,2)
Traceback (most recent call last):
  File "<stdin>", line 1, in <module>
TypeError: kwonly() takes 1 positional argument but 2 were given
>>> kwonly(1, 2, 3)
Traceback (most recent call last):
  File "<stdin>", line 1, in <module>
TypeError: kwonly() takes 1 positional argument but 3 were given
>>> def kwonly(a, *, b, c='spam'):
...     print(a, b, c)
...
>>> kwonly(1, b='eggs')
1 eggs spam
>>> kwonly(1, c='eggs')
Traceback (most recent call last):
  File "<stdin>", line 1, in <module>
TypeError: kwonly() missing 1 required keyword-only argument: 'b'
>>> kwonly(1, 2)
Traceback (most recent call last):
  File "<stdin>", line 1, in <module>
TypeError: kwonly() takes 1 positional argument but 2 were given
排序规则
定义函数时,在一个函数头部中,keyword-only参数必须编写在**args任意关键字形式之前,且在*args任意位置形式之后,当二者都有的时候。例如:
>>> def f(a, *b, **d, c=6): print(a, b, c, d)   # Keyword-only before **!
  File "<stdin>", line 1
    def f(a, *b, **d, c=6): print(a, b, c, d)
                      ^
SyntaxError: invalid syntax
>>> def f(a, *b, c=6, **d): print(a, b, c, d) # Collect args in header
...
>>> f(1, 2, 3, x=4, y=5)
1 (2, 3) 6 {'x': 4, 'y': 5}
>>> f(1, 2, 3, x=4, y=5, c=7)
1 (2, 3) 7 {'x': 4, 'y': 5}
>>> f(1, 2, 3, x=4, y=5) # Default used
1 (2, 3) 6 {'x': 4, 'y': 5}
>>> f(1, 2, 3, x=4, y=5, c=7) # Override default
1 (2, 3) 7 {'x': 4, 'y': 5}
>>> f(1, 2, 3, c=7, x=4, y=5) # Anywhere in keywords
1 (2, 3) 7 {'x': 4, 'y': 5}
>>> def f(a, c=6, *b, **d): print(a, b, c, d) # c is not keyword-only here!
...
>>> f(1, 2, 3, x=4)
1 (3,) 2 {'x': 4}
>>>
调用函数时,传递的keyword-only参数可以在出现在*args之前或者之后,但必须出现在**args形式之前。并且,keyword-only参数可能包含在**args中。例如:
>>> def f(a, *b, c=6, **d): print(a, b, c, d) # KW-only between * and **
>>> f(1, *(2, 3), **dict(x=4, y=5)) # Unpack args at call
1 (2, 3) 6 {'y': 5, 'x': 4}
>>> f(1, *(2, 3), **dict(x=4, y=5), c=7) # Keywords before **args!
SyntaxError: invalid syntax
>>> f(1, *(2, 3), c=7, **dict(x=4, y=5)) # Override default
1 (2, 3) 7 {'y': 5, 'x': 4}
>>> f(1, c=7, *(2, 3), **dict(x=4, y=5)) # After or before *
1 (2, 3) 7 {'y': 5, 'x': 4}
>>> f(1, *(2, 3), **dict(x=4, y=5, c=7)) # Keyword-only in **
1 (2, 3) 7 {'y': 5, 'x': 4}
为什么使用keyword-only参数
keyword-only参数使得允许一个函数既接受任意多个要处理的位置参数,也接受作为关键字传递的的配置选项。
min调用
假设你要编写一个函数,这个函数能够计算任意参数集合和任意对象数据类型集合中的最小值。
以下是3中实现方法:
>>> def min1(*args):
...     res = args[0]
...     for arg in args[1:]:
...         if arg < res:
...             res = arg
...     return res
...
>>> def min2(first, *rest):
...     for arg in rest:
...         if arg < first:
...             first = arg
...     return first
...
>>> def min3(*args):
...     tmp = list(args)
...     tmp.sort()
...     return tmp[0]       # Or, in Python 2.4+: return sorted(args)[0]
...
>>> print(min1(3, 4, 1, 2))
1
>>> print(min2("bb", "aa"))
'aa'
>>> print(min3([2,2], [1,1], [3,3]))
[1, 1]
18.3 一个更有用的例子:通用set函数
>>> def intersect(*args):
...     res = []
...     for x in args[0]: # Scan first sequence
...         if x in res: continue # Skip duplicates
...         for other in args[1:]: # For all other args
...             if x not in other: break # Item in each one?
...         else: # No: break out of loop
...             res.append(x) # Yes: add items to end
...     return res
...
>>> def union(*args):
...     res = []
...     for seq in args: # For all args
...         for x in seq: # For all nodes
...             if not x in res:
...                 res.append(x) # Add new items to result
...     return res
...
>>> s1, s2, s3 = "SPAM", "SCAM", "SLAM"
>>> intersect(s1, s2), union(s1, s2) # Two operands
(['S', 'A', 'M'], ['S', 'P', 'A', 'M', 'C'])
>>> intersect([1, 2, 3], (1, 4)) # Mixed types
[1]
>>> intersect(s1, s2, s3) # Three operands
['S', 'A', 'M']
>>> union(s1, s2, s3)
['S', 'P', 'A', 'M', 'C', 'L']
18.4 模拟Python 3.X print函数
```python
import sys def print3(args, *kargs): ... sep = kargs.get('sep', ' ') # Keyword arg defaults ... end = kargs.get('end', '\n') ... file = kargs.get('file', sys.stdout) ... output = '' ... first = True ... for arg in args: ... output += ('' if first else sep) + str(arg) ... first = False ... file.write(output + end) ... ```
>>> import sys
>>> def print3(*args, sep=' ', end='\n', file=sys.stdout):
...     output = ''
...     first = True
...     for arg in args:
...         output += ('' if first else sep) + str(arg)
...         first = False
...     file.write(output + end)
...
第19章 函数的高级话题
19.1 函数设计概念
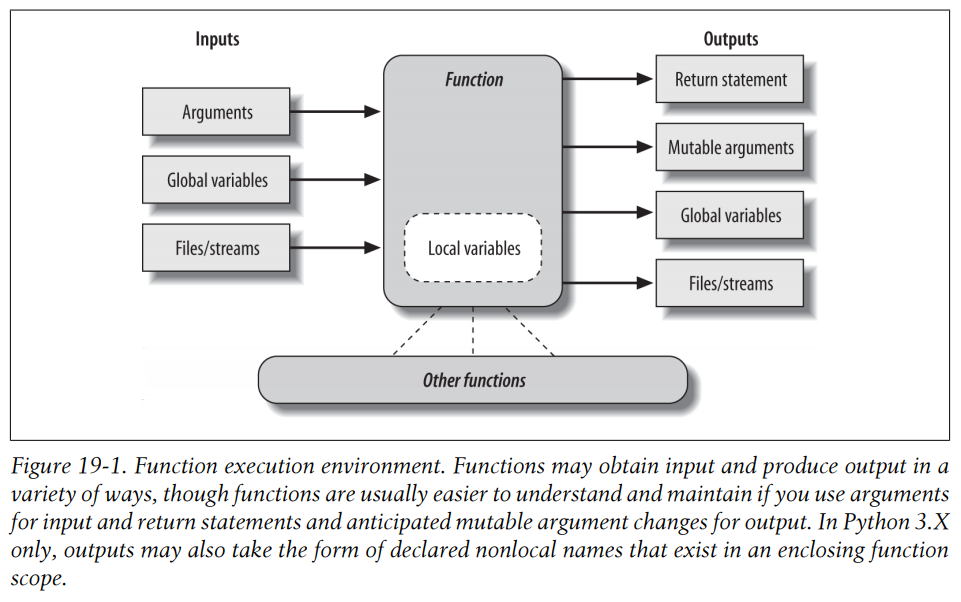
函数设计方针: - 耦合性:对于输入使用参数并且对于输出使用return语句。 - 耦合性:只有在真正必要的情况下使用全局变量。 - 耦合性:不要改变传入的可变类型的参数,除非调用者希望这样做。 - 聚合性:每个函数都应该有一个单一的、统一的目标。 - 大小:每个函数应该相对较小。 - 耦合性:避免直接改变在另一个模块文件中的变量。
下图总结了函数与外部世界通信的方法:
19.2 递归函数
递归函数 是直接或间接地调用自身以进行循环的函数。
用递归求和
>>> def mysum(L):
...     if not L:
...         return 0
...     else:
...         return L[0] + mysum(L[1:])
...
>>> mysum([1,2,3,4,5])
15
>>>
添加一个打印输出,显示每个调用层级的当前列表:
>>> def mysum(L):
...     print(L)    # Trace recursive levels
...     if not L:   # L shorter at each level
...         return 0
...     else:
...         return L[0] + mysum(L[1:])
...
>>> mysum([1,2,3,4,5])
[1, 2, 3, 4, 5]
[2, 3, 4, 5]
[3, 4, 5]
[4, 5]
[5]
[]
15
>>>
递归的替代编码形式
使用if/else表达式替代
>>> def mysum(L):
...     return 0 if not L else L[0] + mysum(L[1:]) # Use ternary expression
...
>>> def mysum(L):
...     return L[0] if len(L) == 1 else L[0] + mysum(L[1:]) # Any type, assume one
...
>>> def mysum(L):
...     first, *rest = L
...     return first if not rest else first + mysum(rest) # Use 3.X ext seq assign
...
>>> mysum([1]) # mysum([]) fails in last 2
1
>>> mysum([1, 2, 3, 4, 5])
15
>>> mysum(('s', 'p', 'a', 'm')) # But various types now work
'spam'
>>> mysum(['spam', 'ham', 'eggs'])
'spamhameggs'
间接递归
递归调用也可以是间接的,如下例:
>>> def mysum(L):
...     if not L: return 0
...         return nonempty(L) # Call a function that calls me
>>> def nonempty(L):
...     return L[0] + mysum(L[1:]) # Indirectly recursive
>>> mysum([1.1, 2.2, 3.3, 4.4])
11.0
循环语句VS递归
>>> def mysum(L):
...     sum = 0
...     while L:
...         sum += L[0]
...         L = L[1:]
...     return sum
...
>>> mysum([1,2,3,4,5])
15
>>>
处理任意结构
递归可以遍历任意数据结构,而简单的循环语句在这种情况则不起作用,因为不是线性迭代。例如,计算一个嵌套的子列表结构中所有数字的总和:
>>> def sumtree(L):
...     tot = 0
...     for x in L:                            # For each item at this level
...         if not isinstance(x, list):
...             tot += x                       # Add numbers directly
...         else:
...             tot += sumtree(x)              # Recur for sublists
...     return tot
...
>>> L = [1, [2, [3, 4], 5], 6, [7, 8]]
>>> print(sumtree(L))
36
>>> print(sumtree([1, [2, [3, [4, [5]]]]]))
15
>>> print(sumtree([[[[[1], 2], 3], 4], 5]))
15
Recursion versus queues and stacks
第五版内容,暂略
Cycles, paths, and stack limits
第五版内容,暂略
19.3 函数对象:属性和注解
同时,函数也支持与调用无关的操作——属性存储和注解。
间接函数调用
Python的函数也是对象,所以可以将其赋值给其他变量名、作为参数传递给其他函数、嵌入到数据结构、作为函数的返回值等等。
把函数赋值给另一个变量名:
>>> def echo(message):      # Name echo assigned to function object
...     print(message)
...
>>> echo("Direct call")     # Call object through original name
Direct call
>>> x = echo                # Now x references the function too
>>> x("Indirect call")      # Call object through name by adding ()
Indirect call
把函数作为参数传递给另一个函数:
>>> def indirect(func, arg):
...     func(arg)
...
>>> indirect(echo, 'Argument call!')
Argument call!
把函数嵌入到一个列表中:
>>> schedule = [(echo, 'Spam!'), (echo, 'Ham!')]
>>> for (func, arg) in schedule:
...     func(arg)
...
Spam!
Ham!
把函数作为返回值:
>>> def make(label):
...     def echo(message):
...         print(label + ":" + message)
...     return echo
...
>>> F = make('Spam')
>>> F('Ham!')
Spam:Ham!
>>> F('Eggs!')
Spam:Eggs!
函数内省
函数作为对象,其自身也具有它的属性。内省工具允许我们探索函数的实现细节:
>>> def func(a):
...     b = 'spam'
...     return b * a
...
>>> func(8)
'spamspamspamspamspamspamspamspam'
>>> func.__name__
'func'
>>> dir(func)     # 查看函数对象的属性
['__annotations__', '__call__', '__class__', '__closure__', '__code__', '__defaults__', '__delattr__', '__dict__', '__dir__', '__doc__', '__eq__', '__format__', '__ge__', '__get__', '__getattribute__', '__globals__', '__gt__', '__hash__', '__init__', '__init_subclass__', '__kwdefaults__', '__le__', '__lt__', '__module__', '__name__', '__ne__', '__new__', '__qualname__', '__reduce__', '__reduce_ex__', '__repr__', '__setattr__', '__sizeof__', '__str__', '__subclasshook__']
>>> func.__code__
<code object func at 0x000001959D4C4780, file "<stdin>", line 1>
>>> dir(func.__code__)
['__class__', '__delattr__', '__dir__', '__doc__', '__eq__', '__format__', '__ge__', '__getattribute__', '__gt__', '__hash__', '__init__', '__init_subclass__', '__le__', '__lt__', '__ne__', '__new__', '__reduce__', '__reduce_ex__', '__repr__', '__setattr__', '__sizeof__', '__str__', '__subclasshook__', 'co_argcount', 'co_cellvars', 'co_code', 'co_consts', 'co_filename', 'co_firstlineno', 'co_flags', 'co_freevars', 'co_kwonlyargcount', 'co_lnotab', 'co_name', 'co_names', 'co_nlocals', 'co_stacksize', 'co_varnames']
>>> func.__code__.co_varnames
('a', 'b')
>>> func.__code__.co_argcount
1
函数属性
除了系统定义的属性,还可以向函数附加任意的用户自定义属性:
>>> func.count = 0
>>> func.count += 1
>>> func.count
1
>>> func.handles = 'Button-Press'
>>> func.handles
'Button-Press'
>>> dir(func)
['__annotations__', '__call__', '__class__', '__closure__', '__code__', '__defaults__', '__delattr__', '__dict__', '__dir__', '__doc__', '__eq__', '__format__', '__ge__', '__get__', '__getattribute__', '__globals__', '__gt__', '__hash__', '__init__', '__init_subclass__', '__kwdefaults__', '__le__', '__lt__', '__module__', '__name__', '__ne__', '__new__', '__qualname__', '__reduce__', '__reduce_ex__', '__repr__', '__setattr__', '__sizeof__', '__str__', '__subclasshook__', 'count', 'handles']
这样的属性可以用来直接把状态信息附加到函数对象,而不必使用全局、非本地和类等其他技术。从某种意义上讲,这模拟了其他语言中的“静态本地变量”——这种变量名对于一个函数来说是本地的,但是其值在函数退出后仍然保留。
Python 3.X中的函数注解
在Python 3.X中,也可以给函数对象附加与函数参数和返回结果相关的注解信息。注解完全是可选的,并且出现的时候只是直接附加到函数对象的__annotations__属性以供其他用户使用。
从语法上讲,函数注解编写在def头部行。对于参数,它们出现在紧随参数名的冒号之后;对于返回值,它们编写于紧跟在参数列表之后的一个->之后。
如下代码注解了函数的3个参数和返回值:
>>> def func(a:'spam', b:(1, 10), c:float) -> int:
...     return a + b + c
...
>>> func(1,2,3)
6
>>> func.__annotations__
{'a': 'spam', 'b': (1, 10), 'c': <class 'float'>, 'return': <class 'int'>}
编写注解的同时仍然可以对参数使用默认值:
>>> def func(a:'spam'=4, b:(1,10)=5, c:float=6) -> int:
...     return a + b + c
...
>>> func(1, 2, 3)
6
>>> func()
15
>>> func(1, c=10)
16
>>> func.__annotations__
{'a': 'spam', 'b': (1, 10), 'c': <class 'float'>, 'return': <class 'int'>}
19.4 匿名函数:lambda
lambda表达式创建一个能够在之后调用的函数,但是它返回了这个函数,而不是讲这个函数赋值给一个变量名。
- lambda 是一个表达式,而不是一个语句。
- lambda的主体是一个单个的表达式,而不是一个代码块。
lambda表达式
lambda的一般形式是关键字lambda,之后是一个或多个参数,紧跟的是一个冒号,之后是一个表达式:
lambda argument1, argument2, ... argumentN : expression using arguments
使用def创建一个函数:
>>> def func(x, y, z): return x + y + z
...
>>> func(2, 3, 4)
9
使用lambda表达式来达到同样的效果:
>>> f = lambda x, y, z: x + y + z
>>> f(2, 3, 4)
9
默认参数也能够在lambda表达式中使用:
>>> x = (lambda a='fee', b='fie', c='foe': a + b + c)
>>> x('wee')
'weefiefoe'
为什么使用lambda
略
如何不让代码变得晦涩
略
19.5 在序列中映射函数:map
map函数会对传入的可迭代对象中的每一个元素都应用于传入的函数,并返回一个包含了所有函数调用结果的一个列表:
>>> list(map((lambda x: x+3), [1,2,3]))
[4, 5, 6]
提供多个可迭代对象作为参数,它能够并行返回分别以每个序列中的元素作为函数对应参数得到的结果的列表:
>>> pow(3, 4)
81
>>> list(map(pow, [1, 2, 3], [2, 3, 4]))          #  1**2, 2**3, 3**4
[1, 8, 81]
19.6 函数编程工具:filter和reduce
函数式编程 是指对序列应用一些函数的工具。
内置函数filter基于某传入的测试函数,过滤出符合条件的元素:
>>> list(range(-5,5))
[-5, -4, -3, -2, -1, 0, 1, 2, 3, 4]
>>> list(filter((lambda x: x>0), range(-5,5)))
[1, 2, 3, 4]
reduce函数对每个元素都应用函数并运行到最后结果:
>>> from functools import reduce
>>> reduce((lambda x, y: x + y), [1, 2, 3, 4])
10
>>> reduce((lambda x, y: x * y), [1, 2, 3, 4])
24
内置模块operator提供了内置表达式对应的函数:
>>> import operator, functools
>>> functools.reduce(operator.add, [2, 4, 6])
12
>>> functools.reduce((lambda x, y: x + y), [2, 4, 6])
12
第20章 解析和生成(Comprehension and Generations)
20.1 列表解析和函数式编程工具
列表解析和map
>>> res = []
>>> for x in 'spam':
...     res.append(ord(x))
...
>>> res
[115, 112, 97, 109]
>>> res = list(map(ord, 'spam'))
>>> res
[115, 112, 97, 109]
````

```python
>>> res = [ord(x) for x in 'spam']
>>> res
[115, 112, 97, 109]
增加测试和嵌套循环
>>> [x for x in range(5) if x % 2 == 0]
[0, 2, 4]
>>> list(filter((lambda x: x % 2 == 0), range(5)))
[0, 2, 4]
>>> res = []
>>> for x in range(5):
...     if x % 2 == 0:
...             res.append(x)
...
>>> res
[0, 2, 4]
>>> [x ** 2 for x in range(10) if x % 2 == 0]
[0, 4, 16, 36, 64]
>>> list( map((lambda x: x**2), filter((lambda x: x % 2 == 0), range(10))) )
[0, 4, 16, 36, 64]
理解列表解析
基于对运行在当前 Python 下的测试,map 调用比等效的 for 循环要快2倍,而列表解析往往比 map 调用要稍快一些。
20.2 生成器函数和生成器表达式
Python提供了工具在需要的时候才产生结果,而不是立即产生结果。特别地,有两种语言结构尽可能地延迟结果的创建:
- 生成器函数 :编写为常规的 def 语句,但是使用yield语句一次返回一个结果,在每个结果之间挂起和继续它们的状态。
- 生成器表达式 :类似于上一小节的列表解析,但是它们返回按需产生记过的一个对象,而不是构建一个结果列表。
由于两者都不会一次性构建一个结果列表,它们节省了内存空间。
生成器函数:yield VS return
生成器函数 是可以送回一个值并随后从其退出的地方继续的函数。
生成器函数在创建时自动实现迭代协议,以便可以出现在迭代背景中。
状态挂起
由于生成器函数在挂起时保存的状态包含它们的整个本地作用域,当函数恢复时,它们的本地变量保持了信息并且使其可用。
生成器函数和常规函数的区别在于:生成器 yield 一个值,而不是返回一个值。
yield 语句挂起该函数并向调用者发送会一个值,但是,保留足够的状态以使得函数能够从它离开的地方继续。当继续时,函数在上一个 yield 返回后立即继续执行。
迭代协议整合
为了支持迭代协议,函数包含了一条 yield 语句,该语句特别编译为生成器。当调用时,它们返回一个迭代器对象,该对象支持用一个名为__next__的自动创建的方法来继续执行的接口。
生成器函数也可能有一条 return 语句,总是在 def 语句块的末尾,直接终止值的生成。
从调用者的角度来看,生成器的__next__方法继续函数并且运行到下一个 yield 结果返回或引发一个 StopIteration异常。
生成器函数应用
下例中定义了一个生成器函数,这个函数将会用来不断地生成一系列的数字的平方:
>>> def gensquares(N):
...     for i in range(N):
...             yield i ** 2
...
>>> gensquares(5)
<generator object gensquares at 0x000001959D7230C0>
>>> gen = gensquares(5)       # 返回一个生成器对象gen
>>> dir(gen)            # 生成器对象gen是包含__next__和__iter__
['__class__', '__del__', '__delattr__', '__dir__', '__doc__', '__eq__', '__format__', '__ge__', '__getattribute__', '__gt__', '__hash__', '__init__', '__init_subclass__', '__iter__', '__le__', '__lt__', '__name__', '__ne__', '__new__', '__next__', '__qualname__', '__reduce__', '__reduce_ex__', '__repr__', '__setattr__', '__sizeof__', '__str__', '__subclasshook__', 'close', 'gi_code', 'gi_frame', 'gi_running', 'gi_yieldfrom', 'send', 'throw']
>>> next(gen)
0
>>> next(gen)
1
>>> next(gen)
4
>>> next(gen)
9
>>> next(gen)
16
>>> next(gen)           # 引发 StopIteration异常
Traceback (most recent call last):
  File "<stdin>", line 1, in <module>
StopIteration
将其放入 for 循环中会自动进行迭代:
>>> for i in gensquares(5):
...     print(i, end=' : ')
...
0 : 1 : 4 : 9 : 16 :
>>>
扩展生成器函数协议:send和next
略
生成器表达式:迭代器遇到列表解析
从语法上来讲,生成器表达式就像一般的列表解析一样,但是它们是括在圆括号中而不是方括号中的:
>>> [x ** 2 for x in range(4)]
[0, 1, 4, 9]
>>> (x ** 2 for x in range(4))
<generator object <genexpr> at 0x000001959D7230C0>
>>> list(x ** 2 for x in range(4))
[0, 1, 4, 9]
>>> for i in (x ** 2 for x in range(4)):
...     print(i)
...
0
1
4
9
>>> gen = (x ** 2 for x in range(4))
>>> type(gen)
<class 'generator'>
>>> dir(gen)
['__class__', '__del__', '__delattr__', '__dir__', '__doc__', '__eq__', '__format__', '__ge__', '__getattribute__', '__gt__', '__hash__', '__init__', '__init_subclass__', '__iter__', '__le__', '__lt__', '__name__', '__ne__', '__new__', '__next__', '__qualname__', '__reduce__', '__reduce_ex__', '__repr__', '__setattr__', '__sizeof__', '__str__', '__subclasshook__', 'close', 'gi_code', 'gi_frame', 'gi_running', 'gi_yieldfrom', 'send', 'throw']
>>> next(gen)
0
>>> next(gen)
1
>>> next(gen)
4
>>> next(gen)
9
>>> next(gen)
Traceback (most recent call last):
  File "<stdin>", line 1, in <module>
StopIteration
>>> sum(x ** 2 for x in range(4))
14
>>> sorted(x ** 2 for x in range(4))
[0, 1, 4, 9]
>>> sorted((x ** 2 for x in range(4)), reverse=True)
[9, 4, 1, 0]
>>>
为什么使用生成器表达式
第五版,暂略
生成器表达式 VS map
第五版,暂略
生成器表达式 VS filter
第五版,暂略
生成器函数 VS 生成器表达式
同样的迭代往往可以用一个生成器函数或一个生成器表达式编写。
>>> G = (c * 4 for c in 'SPAM')
>>> list(G)
['SSSS', 'PPPP', 'AAAA', 'MMMM']
>>> def timesfour(S):
...     for c in S:
...             yield c * 4
...
>>> G = timesfour('spam')
>>> list(G)
['ssss', 'pppp', 'aaaa', 'mmmm']
但生成器函数能够编写更多的逻辑并使用更多的状态信息。
生成器函数和生成器表达式都支持自动迭代和手动迭代:
>>> G = (c * 4 for c in 'SPAM')
>>> next(G)
'SSSS'
>>> next(G)
'PPPP'
>>> next(G)
'AAAA'
>>> next(G)
'MMMM'
>>> next(G)
Traceback (most recent call last):
  File "<stdin>", line 1, in <module>
StopIteration
>>> G = timesfour('spam')
>>> next(G)
'ssss'
>>> next(G)
'pppp'
>>> next(G)
'aaaa'
>>> next(G)
'mmmm'
>>> next(G)
Traceback (most recent call last):
  File "<stdin>", line 1, in <module>
StopIteration
>>>
生成器是单迭代器对象
生成器函数和生成器表达式既是可迭代对象又是其自身的迭代器。因此只支持一次活跃迭代,即,无法创建位于不同位置的多个迭代器。
>>> G = (c * 4 for c in 'SPAM')
>>> dir(G)         # 生成器G包含__iter__和__next__,既是可迭代对象又是迭代器
['__class__', '__del__', '__delattr__', '__dir__', '__doc__', '__eq__', '__format__', '__ge__', '__getattribute__', '__gt__', '__hash__', '__init__', '__init_subclass__', '__iter__', '__le__', '__lt__', '__name__', '__ne__', '__new__', '__next__', '__qualname__', '__reduce__', '__reduce_ex__', '__repr__', '__setattr__', '__sizeof__', '__str__', '__subclasshook__', 'close', 'gi_code', 'gi_frame', 'gi_running', 'gi_yieldfrom', 'send', 'throw']
>>> iter(G) is G          # 生成器函数和生成器表达式既是可迭代对象又是其自身的迭代器
True
>>> I1 = iter(G)
>>> next(I1)
'SSSS'
>>> next(I1)
'PPPP'
>>> I2 = iter(G)
>>> >>> I1 is I2         # 无法创建位于不同位置的多个迭代器
True
>>> next(I2)
'AAAA'
>>>
生成器函数和生成器表达式的这种行为和列表等可迭代对象类型不同,一个列表对象可以创建多个位于不同位置的迭代器,并且在一个活动迭代器中传递并反映它们的原处修改。
>>> L = [1, 2, 3, 4]
>>> I1, I2 = iter(L), iter(L)
>>> next(I1)
1
>>> next(I1)
2
>>> next(I2) # Lists support multiple iterators
1
>>> del L[2:] # Changes reflected in iterators
>>> next(I1)
StopIteration
内置类型、工具和类中的值生成
很多内置类型以生成器的方式工作。例如,字典拥有在每次迭代中产生键的迭代器:
>>> D = {'a':1, 'b':2, 'c':3}
>>> x = iter(D)
>>> next(x)
'c'
>>> next(x)
'b'
字典键也可以手动迭代或使用for循环、map调用、列表解析等自动迭代工具:
>>> for key in D:
...          print(key, D[key])
c 3
b 2
a 1
Generators and library tools: Directory walkers
第五版,暂略
Generators and function application
第五版,暂略
Preview: User-defined iterables in classes
第五版,暂略
Example: Generating Scrambled Sequences
第五版,暂略
Don’t Abuse Generators: EIBTI
第五版,暂略
用迭代工具模拟zip和map
map 以与 zip 配对元素相同的方式,使用多个序列参数,把函数映射到取自每个序列的元素。
>>> S1 = 'abc'
>>> S2 = 'xyz123'
>>> list(zip(S1, S2)) # zip pairs items from iterables
[('a', 'x'), ('b', 'y'), ('c', 'z')]
# zip pairs items, truncates at shortest
>>> list(zip([−2, −1, 0, 1, 2])) # Single sequence: 1-ary tuples
[(−2,), (−1,), (0,), (1,), (2,)]
>>> list(zip([1, 2, 3], [2, 3, 4, 5])) # N sequences: N-ary tuples
[(1, 2), (2, 3), (3, 4)]
# map passes paired items to function, truncates
>>> list(map(abs, [−2, −1, 0, 1, 2])) # Single sequence: 1-ary function
[2, 1, 0, 1, 2]
>>> list(map(pow, [1, 2, 3], [2, 3, 4, 5])) # N sequences: N-ary function
[1, 8, 81]
# map and zip accept arbitrary iterables
>>> map(lambda x, y: x + y, open('script2.py'), open('script2.py'))
['import sys\nimport sys\n', 'print(sys.path)\nprint(sys.path)\n', ...etc...]
>>> [x + y for (x, y) in zip(open('script2.py'), open('script2.py'))]
['import sys\nimport sys\n', 'print(sys.path)\nprint(sys.path)\n', ...etc...]
编写自己的map(func, ...)
使用zip和for循环:
# map(func, seqs...) workalike with zip
>>> def mymap(func, *seqs):
...     res = []
...     for args in zip(*seqs):
...         res.append(func(*args))
...     return res
...
>>> print(mymap(abs, [-2, −1, 0, 1, 2]))
>>> print(mymap(pow, [1, 2, 3], [2, 3, 4, 5]))
使用列表解析式:
# Using a list comprehension
>>> def mymap(func, *seqs):
...     return [func(*args) for args in zip(*seqs)]
...
>>> print(mymap(abs, [−2, −1, 0, 1, 2]))
>>> print(mymap(pow, [1, 2, 3], [2, 3, 4, 5]))
使用生成器函数:
# Using generators: yield and (...)
def mymap(func, *seqs):
    res = []
    for args in zip(*seqs):
        yield func(*args)
使用生成器表达式:
def mymap(func, *seqs):
    return (func(*args) for args in zip(*seqs))
编写自己的zip(...)和map(None, ...)
略
20.3 Python 3.X解析语法概括
除了列表解析和生成器,在Python 3.X中还有2种解析表达式形式:集合解析和字典解析。
- 集合解析:新的常量形式
{1, 3, 2}等同于set([1, 3, 2]),并且新的集合解析语法{f(x) for x in S if P(x)}就像是生成器表达式set(f(x) for x in S if P(x)),其中f(x)是一个任意的表达式。 - 字典解析:新的字典解析语法
{key: val for (key, val) in zip(keys, vals)}像dict(zip(keys, vals))形式一样工作,并且{x:f(x) for x in items}像生成器表达式dict((x, f(x)) for x in items)一样工作。
以下是Python 3.X中所有解析替代方式的总结:
>>> [x * x for x in range(10)] # List comprehension: builds list
[0, 1, 4, 9, 16, 25, 36, 49, 64, 81] # Like list(generator expr)
>>> (x * x for x in range(10)) # Generator expression: produces items
<generator object at 0x009E7328> # Parens are often optional
>>> {x * x for x in range(10)} # Set comprehension, 3.X and 2.7
{0, 1, 4, 81, 64, 9, 16, 49, 25, 36} # {x, y} is a set in these versions too
>>> {x: x * x for x in range(10)} # Dictionary comprehension, 3.X and 2.7
{0: 0, 1: 1, 2: 4, 3: 9, 4: 16, 5: 25, 6: 36, 7: 49, 8: 64, 9: 81}
Scopes and Comprehension Variables
第五版,暂略
解析集合和字典解析
从某种意义上来讲,集合解析和字典解析只是把生成器表达式传递给类型名的语法糖。因此,两者都接受任何可迭代对象,包括生成器:
>>> {x * x for x in range(10)} # Comprehension
{0, 1, 4, 81, 64, 9, 16, 49, 25, 36}
>>> set(x * x for x in range(10)) # Generator and type name
{0, 1, 4, 81, 64, 9, 16, 49, 25, 36}
>>> {x: x * x for x in range(10)}
{0: 0, 1: 1, 2: 4, 3: 9, 4: 16, 5: 25, 6: 36, 7: 49, 8: 64, 9: 81}
>>> dict((x, x * x) for x in range(10))
{0: 0, 1: 1, 2: 4, 3: 9, 4: 16, 5: 25, 6: 36, 7: 49, 8: 64, 9: 81}
>>> x # Loop variable localized in 2.X + 3.X
NameError: name 'x' is not defined
针对集合和字典的扩展的解析语法
和列表解析及生成器表达式一样,集合和字典解析都支持嵌套子句。例如,可以嵌套相关的if子句从结果中过滤掉元素:
>>> [x * x for x in range(10) if x % 2 == 0] # Lists are ordered
[0, 4, 16, 36, 64]
>>> {x * x for x in range(10) if x % 2 == 0} # But sets are not
{0, 16, 4, 64, 36}
>>> {x: x * x for x in range(10) if x % 2 == 0} # Neither are dict keys
{0: 0, 8: 64, 2: 4, 4: 16, 6: 36}
嵌套的for循环也是有效的:
>>> [x + y for x in [1, 2, 3] for y in [4, 5, 6]] # Lists keep duplicates
[5, 6, 7, 6, 7, 8, 7, 8, 9]
>>> {x + y for x in [1, 2, 3] for y in [4, 5, 6]} # But sets do not
{8, 9, 5, 6, 7}
>>> {x: y for x in [1, 2, 3] for y in [4, 5, 6]} # Neither do dict keys
{1: 6, 2: 6, 3: 6}
和列表解析一样,集合解析和字典解析也可以在任何类型的可迭代对象上迭代:
>>> {x + y for x in 'ab' for y in 'cd'}
{'ac', 'bd', 'bc', 'ad'}
>>> {x + y: (ord(x), ord(y)) for x in 'ab' for y in 'cd'}
{'ac': (97, 99), 'bd': (98, 100), 'bc': (98, 99), 'ad': (97, 100)}
>>> {k * 2 for k in ['spam', 'ham', 'sausage'] if k[0] == 's'}
{'sausagesausage', 'spamspam'}
>>> {k.upper(): k * 2 for k in ['spam', 'ham', 'sausage'] if k[0] == 's'}
{'SAUSAGE': 'sausagesausage', 'SPAM': 'spamspam'}
第21章 The Benchmarking Interlude
21.1 计时迭代的替代方案Timing Iteration Alternatives
第五版,暂略
21.2 Timing Iterations and Pythons with timeit
第五版,暂略
21.3 Other Benchmarking Topics: pystones
第五版,暂略
21.2 函数陷阱 (Function Gotchas)
本地变量是静态检测的
>>> def selector():
...     print(X)
...
>>> selector()
99
>>>
>>> X = 99
>>> def selector():
...     print(X)
...     X = 88
...
>>> selector()
Traceback (most recent call last):
  File "<stdin>", line 1, in <module>
  File "<stdin>", line 2, in selector
UnboundLocalError: local variable 'X' referenced before assignment
在函数中,不可能同时使用一个简单变量名的本地变量和全局变量。如果真的希望打印全局变量,并在之后设置一个有着相同变量名的本地变量,导入上层的模块,并使用模块的属性标记来获得其全局变量。
>>> X = 99
>>> def selector():
...     import __main__            # Import enclosing module
...     print(__main__.X)          # Qualify to get to global version of name
...     X = 88                            # Unqualified X classified as local
...     print(X)                          # Prints local version of name
...
>>> selector()
99
88
在交互模式下的命名空间是__main__,所以__main__.X得到了全局变量X。
可变对象的默认参数
>>> def saver(x=[]): # Saves away a list object
...     x.append(1) # Changes same object each time!
...     print(x)
...
>>> saver([2]) # Default not used
[2, 1]
>>> saver() # Default used
[1]
>>> saver() # Grows on each call!
[1, 1]
>>> saver()
[1, 1, 1]
没有return语句的函数
在Python函数中,return和yield语句是可选的。从技术上来讲,所有的函数都返回了一个值,如果没有使用return语句明确返回值,函数将自动返回None对象:
>>> def proc(x):
...     print(x)               # No return is a None return
...
>>> x = proc('testing 123...')
testing 123...
>>> print(x)
None
杂乱的函数陷阱
Enclosing scopes and loop variables: Factory functions
略
Hiding built-ins by assignment: Shadowing
第五版,暂略